3 way vertex paint material
|
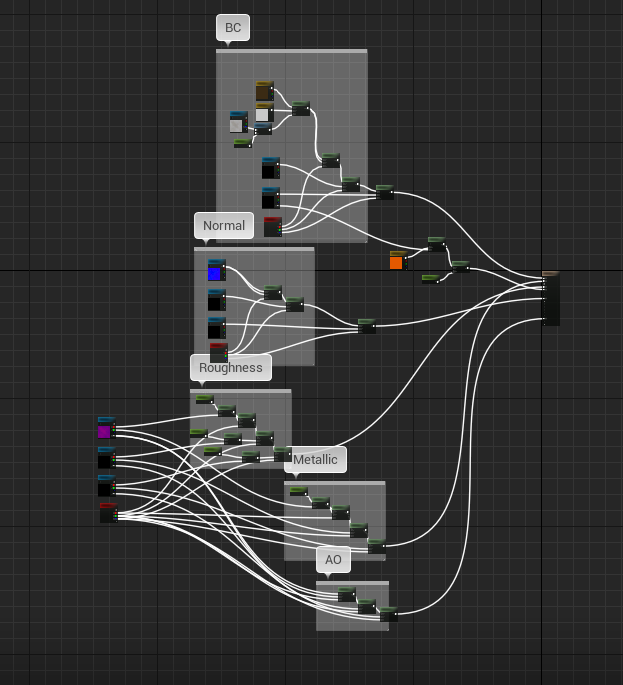
Hello, it has been a while! If you don’t remember me, I’m Ricardo Aranda and I’m on my second year studying Game design and graphics. I’m currently working on a game called Refracted Fate as a student project. I’m a graphical artist and the lead artist of the team. Refracted fate is an adventure puzzle game with horror aspects in first person view. The player takes the role of a dimension shifting character trapped in a facility and needs to escape. The artifact I’ll talk about in this post is a master material I made in Unreal engine with the option to use vertex paint and some other options. We found that vertex paint would help us put dirt, rust, wear and tear on the textures fast and easy. This would also hide the obvious patterns of the repeating textures. As I’m new to the material editor and to Unreal engine in general, I had to follow some tutorials and check Unreals website for information about vertex painting and how to make parameters for the material instances. I found this interesting and fun and it led me to watch more tutorials on other type of materials which helped me learn more about the material editor and how you can make other types of materials. Here’s a picture of the setup of the material and the maps used for it. We have the base color, normal map and a roughness/metallic/ambient occlusion map.
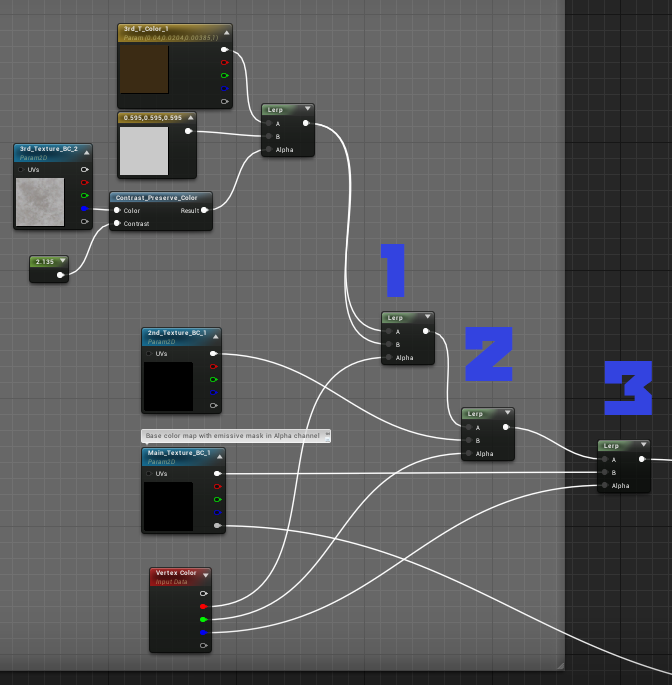
The maps are basically setup in the same way for the vertex painting option. I made a three way vertex paint material but it would have been sufficient with just two. The base color maps are made into parameters so we can change them in an instance material. The first map on top is just a basic dirt material and it’s almost never used, it uses the red channel for the vertex paint. The mid map is the second map and uses the green channel. Here’s where we put the second version of the main texture, that has rust, dirt, scratches and so on. The bottom texture node is the main map and uses the blue channel for the vertex paint. As you can see in the picture below the maps are connected to a linearInterpolate (lerp) node in a stair kind of way. This one shows the base color maps.
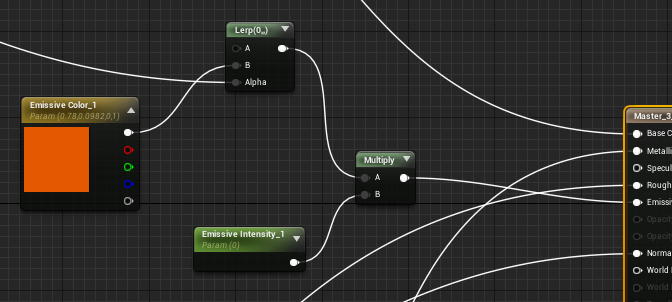
The maps RGB channel connects to the lerps B channel which then goes to the next lerps A channel, except for the top map which is connected to both A and B in the first lerp node(1.). The lerp nodes Alpha channel is then connected to the different channels of the Vertex color node. Red channel to the first lerp, green to the second lerp and blue to the third lerp. After I made this material I found that I wanted to give it an option of having a parameter for emissive color as we don’t use external programs for painting the emissive (see picture below). This allows us to make fast changes to the emissive color if necessary. For this we need a blending mask. I told the other artists to put the mask for the emissive color in the alpha channel so it could blend with the emissive. I could have done it with having the mask as a separate texture but combining textures is better for optimization purpose and reduces the texture samplers in the material editor. The base color alpha channel is connected to the alpha of a lerp node which has the emissive color connected to the B channel. The lerp node then connects to a multiply that has a parameter that alows me to control the intensity of the emissive, putting it to 0 hides the emissive color.
The last map includes roughness/metallic/AO, they are set in the red, green and alpha channel, the blue channel has the height map but we don’t use that in this material. As you can see in the picture below I put a multiply node with a parameter connected to the roughness that allows me to adjust the roughness in the material instance. This will make it easier to fix the roughness and we will be able to see the result in real time in the engine. To adjust the roughness in an external program takes longer and you can’t see how it would look in the engine while fixing the roughness.
I feel more comfortable in the material editor now after i have been working on this material and other ones. It has helped my workflow to be more efficent. I can adjust maps and colors directly in the engine instead of going back to Substance Painter, make the adjustments and hoping that the result is good. That’s all! see ya next time! =) |