Boaty water like no other
|
The ocean is what the player is going to stare at for most of the playthrough. That is why a lot of effort was put into making the ocean look attractive. Some design decisions were made early on, while others came along as the ocean changed between versions of the game. Water would normally go into the art category, but I felt like I could do something interesting, favoring programming techniques instead of art. This post will be one of the longer ones, so please grab a cup of organic green tea before reading on. Let’s dive in How do you make a flat 2D top-down ocean look interesting? It turns out it’s a lot harder than one would imagine. But it’s just water, right? How hard can it be? As with everything, we started with the basic shape. The first version of the ocean was just a simple plane with a water texture applied to it. It looked fine, but it didn’t feel alive, so I just slapped a water trail behind the boat to give the impression of fluidity. The trail is a simple particle effect, but more on that in another post. 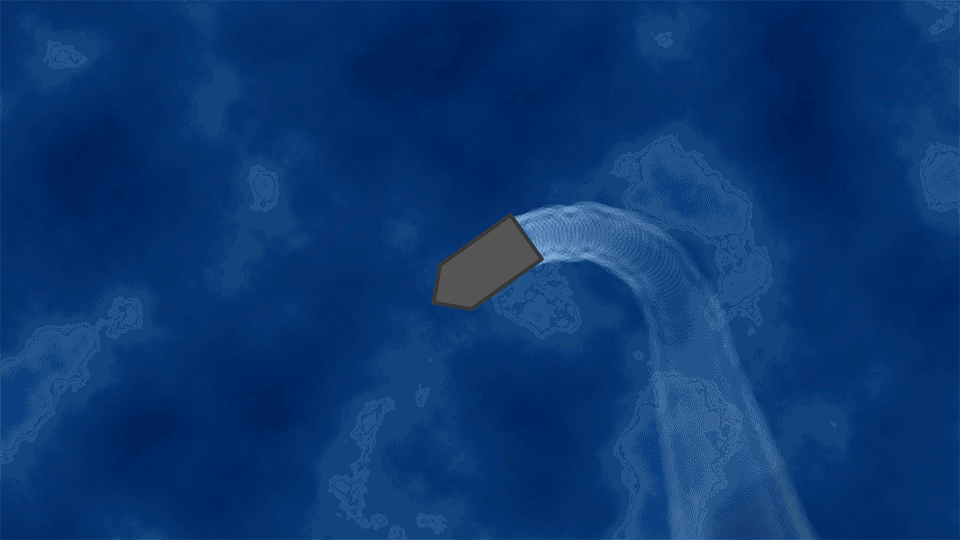 It still looked too flat to me. It could have worked if we were going for a more cartoony look, which was the original idea, but being the cough lead artist cough, I decided that it wasn’t enough. Breaking it apartWe’re literally breaking the water apart. First by imagining how water actually behaves. Things that come to mind are waves, transparency, light reflections and so on. Waves could be animated by the artists in the group, but that would be a very time consuming task. Transparency plays an effect on the depth perception. You’re usually able to see through any source of water to an extent. Reflections and refractions enhances the look by bending the light in different ways. After identifying the attributes of the water, we want to apply those to separate layers. Before we go any further, you should know how our infinite ocean is represented in Unity. You can read about the concept in this blog post by our project manager, Vidar Grönros, but I’m gonna walk you through the technical details. The water is essentially a plane that is attached to the boat. The plane is slightly larger than the camera and has the water texture applied to it. This way, the player can move in any direction without ever running out of water.  There is one problem though; when playing the game, the boat looks stationary because the water moves with it. To deal with that, the water texture is offset by the same velocity as the boat, but in the opposite direction. This gives the same effect as if the water is just a huge plane covering the whole game world. 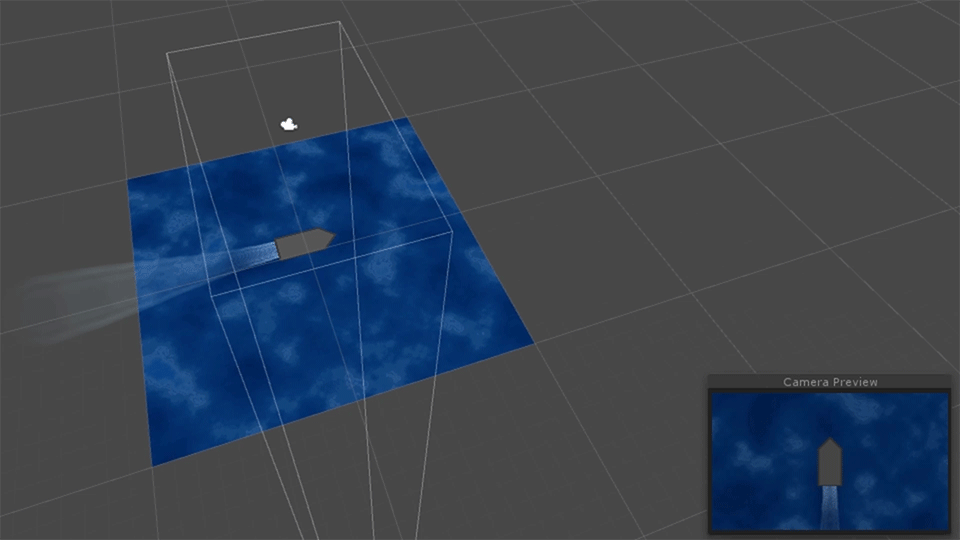 This works because the ocean texture is tileable, so it repeats seamlessly in any direction. Seems like unnecessary work, but it’s all going to make sense. Need more depthOne of the attributes we identified was depth. The easiest way to achieve this in a 2D environment is by taking advantage of the parallax effect. The parallax effect is mostly seen in background environments where objects closer to the camera moves quicker than the mountains at the horizon. The effect is not limited to horizontal views though; it can just as easily be used in our top-down perspective. ParallaxThe way to do this is by separating the ocean into different layers. The top layer is closest to the ship and should therefore act as a stationary plane – or else the player will feel disorganized when moving around. The slower movement of the other layers is what gives the parallax effect. If the game was to use a camera with perspective, the parallax effect would be easy to achieve by just layering the background planes with some distance in between. However, the game uses an orthographic camera, which means that the perception of depth is completely lost. In order to make the parallax effect work, each plane has to be manually offset using the same technique as explained before. LayeringThe ocean is separated into five different layers. There is the seabed, the waves and everything in between. The bottom layer is completely opaque while all the others are semi-transparent in order to make details from the layers below pop through.  What makes the magic is that the planes are being offset at different speeds. The top layer has the same speed as the boat, with the others gradually decreasing the closer to the bottom they are. More effectsThe ocean has depth now, but still looks a bit dull. I think the best way to explain it is that it doesn’t look very wet. There is no volume in the water. Besides, the parallax effect only works when the boat is moving. Some animated waves might fill that gap, but animating sprites I can’t do. Let us instead play with some other effects. For this, I’m taking some help from the Unity standard asset package, which has a shader for water surfaces. Shader programming is way out of scope for this project, so the extra help is nice. The shaderThe water shader comes with fancy things like surface reflections and and wave generation, but those doesn’t really suit the project. I’m mostly interested in the bump map generation and refraction. The bump maps will be used to give the ocean surface those moving micro waves, and the refraction will distort anything that renders behind the bump map, like the monsters. The shader basically combines two bump maps and scrolls them in different directions, giving the effect of slow and shallow waves.  The bump map helps with creating fake 3D effects, by modifying the lightning based on the color data from the bump map. Here is a Wikipedia article on it.  Putting it all togetherWith all of the techniques we’ve gone through, the result is pretty immersive. It actually looks like the monsters are under the water surface, which really fits the aesthetics of the game. The spotlight also has the same effect, because what you’re seeing is the light that’s hitting the floor below the water. That was unintentional, but looked good, so we decided to keep it. Yes, it was totally a group decision.  That’s it folks! I hope this gave some insight into how the ocean was created. There was a lot of experimenting and a lot of happy accidents that ultimately led to this moment. |