Curvy trails of motion; using Beziers to smooth things out
|
So… I like OpenGL…. and trianglestrips… so this will be yet another post about something made using just that: namely ”motion trails”! For those unfamiliar with the term, trails (they probably go by different names too), are essentially what makes up the ”blades” in games like Fruit Ninja:
Too make this, I followed basically the same steps as I did when creating the walls (see last blog post). I start by, every few frames (initially I set it to once every 5th second), saving the latest position of the object into a two-dimensional vector. As you move around, these points will form a path where the object has previously been, and will work as control points for the forming of the trianglestrip (which is what you will actually see on-screen).
To make sure that we don’t get an infinitely long trail, we need to remove the ”oldest” position after a certain point, say 20 positions. Since the positions were stored in an std::vector, to do this I only had to do: controlpoints.erase( controlpoints.begin() ); This will make sure that we, at very most, will have 20 controlpoints in our trail. Past this point, I simply applied the same principles as for the walls; calculate the angle between each point and the last ( except for the first point since there is no preceeding in this case ), and using cosine and sine, multiplied by the desired width of the trail, to get the X and Y values respectively, create polygons along the path.
The polygons are recreated every frame, making sure that we always have a trianglestrip that follows the path correctly! I then mapped the UVs along the texture (again, just like with the walls). The difference here though, is that the purpose of the trail was to have motion-lines behind the player, once a certain power-up is aquired. This meant that, whilst we could’ve left it at this point, having the texture always mapped perfectly within the bounds of the trail would make it look more like a piece of cloth, or a flag, following the player around. We wanted lines to ”come off” of the players body, like the wind bending around him, and for this, we needed a panning texture. You might have heard of panning from people talking about film for example, as in a camera pan. This simply means that the camera starts at one position, and then moves along one direction (left to right for example), revealing more and more of the scene as it goes along. This is basically what panning a texture does, it moves it from one position to another. To have this work properly though, we need to make sure that the texture repeats, otherwise we would see the texture pan along the path, and then dissappear, never to be seen again. In SFML this is simply done by doing: Texture.setRepeated( true ); //Texture is an sf::Texture This means that as the texture slowly dissappears at one end of the trail, it will reappear at the other. This is a great effect for simulating a multitude of things in a cheap way. It is often used in 3D-games to simulate a flowing river or similar where you would have a texture of water, panning along the mesh. This is what our texture looks like:
It’s simple, but since it will be moving, it doesn’t really matter (it gets the job done, without unnecessary clutter). At this point, the effect could be done, but as is often the case, first tries rareley yield perfect results. Our specific usage for this effect requires the trail to be as smooth as possible (like mentioned it is supposed to simulate wind). Unfortunately this is where the problem lies:
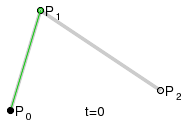
As I hope you can see (screenshots can be difficult to capture sometimes To solve this, I figured that if I instead of taking every controlpoint’s position litterally and creating a pair of vertices there, took the first and last position and, using a controlpoint in the middle, calculated a bezier curve, I could make sure that the trail is always smooth, no matter how the player moved. To explain this further, a bezier curve works as follows:
Over a set amount of time (t), you calculate the position of three points, each moving along it’s own vector. The first two move from it’s starting position towards the next: the first moves towards the middle point, and the middle one towards the last. Lastly, the third (and the position you actually want), simply moves along a vector between these other ones. It would look something like this: v1 = (p1 – p0) * t; It’s not a terribly complicated algorithm, but a powerful and useful one nontheless! Using this method, we get the following:
Regardless of the jittery movement, which before would create a very edgy looking trail, we will now always end up with a smooth mesh! The downside to this approach is, of course, that if we can’t get very much detail in how the mesh follows the path. This is because we use a quadratic bezier curve. Using a higher resolution curve, such as a cubic one or higher, we can have a smooth mesh, whilst still retaining some of the variation in the path! Final result:
|