Reworked HUD with a reticle
|
Our game is nearing its finished state, and we have been working hard on polishing the features. Earlier I wrote about a working on the HUD, and how we were thinking of adding a reticle which would display the cooldowns in a more intuitive way. So I worked on that a bit. We received a lot of feedback that our teleport cooldown was not visible, as it was in the bottom left corner, so we wanted that to be on the reticle. We also implemented flamthrower and shield abilities so we added those to the reticle. The two other power ups are simply buffs to the teleport and basic attack and hence do not require their own indicators. So as we had 3 things we wanted to clearly show the player, we thought a bit how the reticle should look, we ended up deciding on a circle, surrounded by two half circles. Shown below: Now to talk shortly about how this was achieved in unity. I think I briefly discussed this in my previous blog post about the HUD too but this is a slightly more sophisticated system than last time. So how it works is that the reticle is an UI image, rather than explain this words I’ll just show my hierarchy for it: So, as you can see the parent of the reticle is the Center fill image. That is the orange circle, then the rest of the pieces are children of it. This was done simply to make it easier to keep track of the reticle as a single object, and it makes it easy to disable the sides for the first level while keeping the center. The center fill holds the reticle script which simply follows the mouse position, with one line of code in the update loop: transform.position = Input.mousePosition; The the image fill is handled by the camera which holds the HUD script(which was created earlier, I just added Images for the flame thrower and the shield to it. The teleport Image was already there so it was just a matter of updating with the new UI Image. In the HUD script’s start function we set these variables, along with a few others(not shown here)
The calculations here are done in order to convert the numbers to be between 0 and 1, as the Image.fillAmount uses that scale, 1 being fully filled and 0 being empty. One thing I forgot to mention is that, in the UI images you should set the “Image Type” to “filled” which will allow you to use the Image.fillAmount in the code. Well, I think this concludes this post, I am happy with the reticle functionality, it is much cleaner and more intuitive to the player than an icon in the bottom corner. |
 This way we can have 3 different cooldown bars following the player’s focus. We decided that since in the first level of the game, you only have the teleport skill(and basic shooting), that the centre of the reticle should be the teleport and the sides should be disabled unless the abilities are available. As of now the side bars are always visible on the second level though, even if the player does not choose the telport or shield abilities. Nevertheless we are quite happy with how clear the reticle is. The reticle can be seen in action below:
 The left side bar is the indicator for the shield, it is simply emptied when the shield is activated and slowly fills as the cooldown runs.
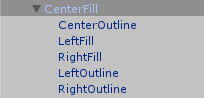
 Then in the update loop we change the images fill amount according to the variables we get through the above variables, like so: