First post: Motion Capture
|
Perhaps a day or two late (try four weeks Linda, get your shit together), but better late than never! This first ever blog post about our game Rune Mages will cover very beginning of my work on the animations. Being the Lead Animator I felt like that would be a suitable subject. I decided to use Motion Capture for our game since we will have four characters, all with unique and individual animations. Doing them by hand would have been way to time consuming considering we only have 8 weeks (officially) to produce our games (I took the course Motion Capture for games earlier this semester, which is why I could use this brilliant method). The first thing I did was to plan the animations together with the rest of the group. We decided what kind of animations each one would have and how they would look. To keep track of everything I composed an animations list, where I listed Name, Start/End pose, Loop and Description. The name was given using this formula; State/Action/Mode, for example Stn_Idl_Rdy (Standing_Idle_Ready). So for example, the animations list for the character Raum looks like this;
So – flashing forward to the shooting day. I used our Lead Art, Jonatan, as the actor for all four characters, which must have been very tiring but he certainly stepped up to the challenge. The shooting started with me preparing the studio, which includes clearing away tables and chairs, cleaning the floor, masking all reflective surfaces and calibrating the cameras, a process that takes about 45 minutes all in all. After that, it was time for the actor and the rest of the team to get to work. Once the actor is dressed in the incredibly attractive body sock covered in velcro, it is time to get marking. Marking the actor means that you first checks to see if the actor is okey with you touching them (no means no people!), and after that you put small reflective balls at all the important limbs and bendings on the body. The cameras pick up the reflectiveness and calculates how to create the skeleton in the software. Our studio at Uppsala University uses the cameras and software from Motive, which I find is very user-friendly. 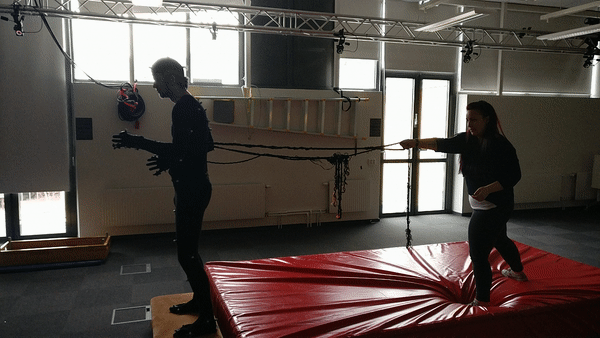 Then it was time to get shooting! By using the (very clever) animations list we had composed earlier we knew exactly what to record and how it should look. The parent of the game concept Philip took the role of Director, since he had an idea of how he wanted it all to look. I, being the only one in the team to have taken the Motion Capture course, settled down by the computer and managed the software, which basically means pressing play/pause and making sure all markers gets picked up by the cameras, and also made sure that what we recorded would be usable in the upcoming work of getting a modeled mesh to move like the mocap-data. The shooting went smoothly and Jonatan did a great work in portraying all characters! The whole project took about 9 hours, including the pre-work on the studio as well as lunch and brakes. Then followed the processing of recorded data, which means looking at the recordings and check for any errors and gaps. Gaps means that one or more markers have not been properly recorded. So what you do to fix this is going through marker by marker, find the gaps and fill them. This could either mean pushing the magical button called ‘Fill Gaps’, or by ghost markers. ‘Fill Gaps’ means that the software calculates how the marker should move based on surrounding data, this is useful for smaller holes at a maximum of 100 to 150 frames. If you are lucky, the cameras will have caught the marker but have been unable to register which limb it belongs to, and thus creating the ghost marker. What you do then is just assign the ghost marker to correct limb, and that will fill the gaps. This work took about a week, which is a reasonable time considering we did over 120 takes… After the cleaning you take the recorded data and put them on a mesh, but more about that will follow in upcoming blog posts about each character! Hasta la vista babies |

