Week four post
|
So this week i actually worked on something else than the enemies for our game. This week was dedicated to the animation of the games protagonist himself: Captain Noleg himself
Up until this point we had only made keyframes for the captains different states. These were all we needed in order to test the game out and see if his design and color scheme would work in the background. However, at this time all the keyframes for the games different enemies and the captain himself are complete. This means it’s time to move on to polish and adjustments in order to improve upon the games current assets.
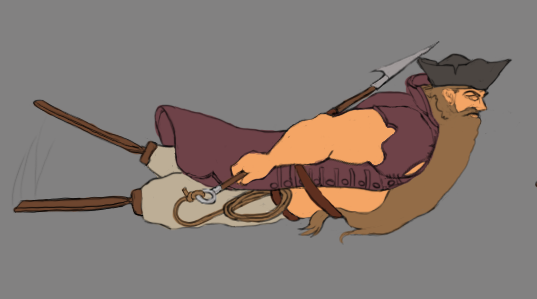
The image shown above is one of the placeholder keyframes we used up until this point. As you can see, I’ve chosen to adjust the animation from the keyframe slightly. Namely by changing the position of his right arm. A core mechanic in our game is throwing a harpoon. For this reason i decided to adjust his arm so that he would constantly be holding the harpoon, ready to throw it. This is an improved design for two reasons in my opinion. Firstly: He looks much more trigger happy and prepared for any threat that might appear. And in a game where you will run into enemies non stop this feels like an appropriate stance. The second reason is that it simply makes the transition between the swimming and throwing the harpoon much smoother. This makes a lot of difference since we cant have the animation of the captain throwing the harpoon take up too much time and having the captains hand move from his hip to his back takes much more time than simply having him hold it from the start. Now onto the walkthrough of the process. Though the process in itself isn’t that complicated, i fear i might fail to explain it in simple terms. But here goes: The program i used for this animation is photoshop. When i started working on the full animation i began by copying one of these keyframes into a new file. After that i set the layer containing the keyframe to a low opacity, around 30%. I then created a new layer and started drawingthe lineart over the keyframe, changing and adjusting things in order to improve on the previous design. Some changes weren’t improvements in a visual sense however, but rather improvements in the practical sense. For an example to change the placement of the harpoon and the rope attached to it so that it disappears behind him rather than having it show on his hip. Changes like these are simply time savers. After redesigning it and creating the first new frame i created a new layer and using photoshops timeline function i added a new frame. On this frame i drew the pose that would be furthest away from the first one. To explain what i mean i’ll use an example. Say for an instance that i move my hand left and then right in a pattern. The first frame i created could then be when my hand is furthest to the left and the second would be when my hand is the furthest to the right (or vice versa). I can now flip between these to poses and see the frame of movement within which i can work. After that i ”simply” redrew every new frame in between the first two frames. After doing this i created new layers for each frame and filled in the line art with color. One thing to consider and remember when working with animation (or anything art related when working digitally) is to use more than one layer. Whenever i want something to overlap in animation, i draw them in separate layers. This way you can easily erase and make changes as you go along. Excuse me if the explanation was overly complicated. |