Creating a Basic Camera
|
So this week I’ve been working on getting a camera to work as well as getting tile based things to be drawn correctly, however I’ll be focusing on my camera work!
So if you are not familiar with the concept I’m working on I’ll go through it quickly. The game is called “Trowl” and you play as an owl mother who lives on a train with her children. The train start to move, scattering the owl mother and her owlets across the train. Your job is now to find your babys and bring them to safety befor you pass out due to stress. Stress is like a reversed health bar where it fill up over time and once reached max you lose, the way to make it go down is by picking up owlets and fending off evil birds.
So, back to what this post is about. Cameras in SFML. Before this week I had no idé how cameras worked in SFML, so when I started to work with it I only had a few different idéas to work with. My first thought was to, in some strange way, move all the things on the screen exept the player. That would create the illusion that the player is moving around. My other idéa was to try move the viewpoint it self, like you would with a regular camera, the only problem was that I could not think of any way to do this while I on the other hand could think of ways to make the other solution work, however somewhat difficult and bound to come packed with buggs and errors… So like most people would do, I search on google for tips and tricks and I find this, “sf::View“.
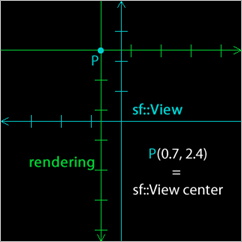
(Image taken from github post linked bellow) sf::View sounded to be what one would think of as a regular 2D camera where it separates the “world” and the “viewpoint”, thinking I was on the right track I looked into it a bit more and found a great explenation and tutorial with a downloadable project on github which tought me how to use sf::View as well as confirming that it was what I was looking for to create our camera. If you are intressted in reading that post then here is the link! The reason I felt it was the right thing to use was because it sounded simple and I realized that I could make the viewpoint move with the player instead of trying to move everything else.
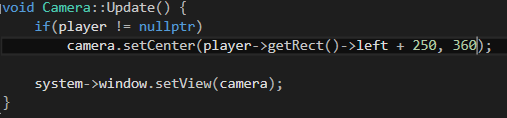
So how did I get it to work in our project? First thing I did was to prototype and see what it was exactly that I wanted to get out of my cameras. I figured that for now it was enough if the camera followed our player in the x-axis and tried to make that work. Why the x-axis was enough was because we currenty are unsure on how high/low we want our player to be able to move and therefor decided it was enough for the alpha. Using the function “setCenter(pos-x, pox-y)” I could simply grab the x-position of our player and put it in where the x-position would be as well as putting in half of the screen height for the cameras y-position. At first the camera never updated but I quickly figured out that it was because I actually never updated the viewpoint. In order to update the viewpoint I had to call “window.setView(camera)” that told the window what viewpoint to render. Now the prototype worked and I could start to try and make all this as small and reusable as possible (so that it easily can be used in different states). Next I created a .h and a .cpp file for my cameras. The camera, when created, took either one or two arguments. Both required, what we call in our project, a “system”. It is a struct that contain all information about our window and renderer, the cameras require this in order to update the viewpoint them self. The other argument which isn’t requred to create a camera was the position of a “player”. This was necessary to update the viewpoints position to be where the player was. The reason for why it was a optional argument was due to the fact that I had to make a separate camera for our HUD wich I don’t want to follow the player. This was something that I realized a day later when I saw that our HUD elements where drawn like they were part of the game world and not static on the screen.
With the code for the cameras done I now implemented it into our game state, created them once the state started and updated them in a specific order in our update function. The order was like this, before anything is drawn I update the camera that follows the player, this making it the active viewpoint onto wich everything in the game world will be drawn. The game state then proceed to draw all world elements. When all the world elements was drawn I update the HUD camera turning it to the active viewpoint, then draw all the static HUD elements. The reason I did it in this order was because I want the HUD to be drawn last so that it is displayed over everything else.
And then it worked!
Ofcourse these are just very basic cameras and I want them to move and act differently in the end, however since the main viewpoint is dependent on the player I want to wait for a more finnished player object before I do the finalizing touches on the cameras.
I really wanted to put in a gif or a video on how it looks but for some reason my pc:s graphics card crashes when I try to do just that… |