The Last Signal. Post #5: full animation system implementation
|
In this post, I’m going to go into the details of creating a full-blown animation system for our game, something I had promised to do sometime in the future in the previous post. How animations work in (2D) video gamesIn video games, the effect of animation is achieved by very quickly switching between pictures which depict the same character/object/effect etc. at slightly different times. If switched sufficiently quickly, the sequence of frames will give the impression of smooth continuous motion. In our project, the graphics artists provide us with the following deliverables:
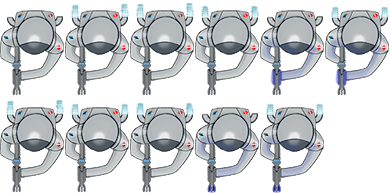
E.g., the sprite sheet for the astronaut used in our game looks like this:
The graphics artists create every frame separately and place them in the same file for easier management. Each frame is contained in a rectangle which can be referred to by specifying its coordinates. When working on (2D) video games, we use a slightly different coordinate system to the one standard in mathematics: while the x-axis still points to the right, the y-axis points downwards and the origin (0;0) lies in the upper left corner of the screen. This convention is carried over from the age of CRT display technology. Back then, an electron beam would trace horizontal lines left to right, top to bottom; this was how every frame in the screen was drawn. While this technology is dated, the tradition persists. There are numerous ways of how you can refer to a rectangular area in a sprite sheet. You can, e.g. specify the (x;y) coordinates of every corner (vertex). You can, however, do it like this: you specify the coordinates of the upper left vertex of the rectangle and then the width and the height of the rectangle (4 numbers are needed in total). This method is standard and was also used by our graphics artists. So in the animation data file (which as I mentioned is also provided) they list coordinates for every frame:
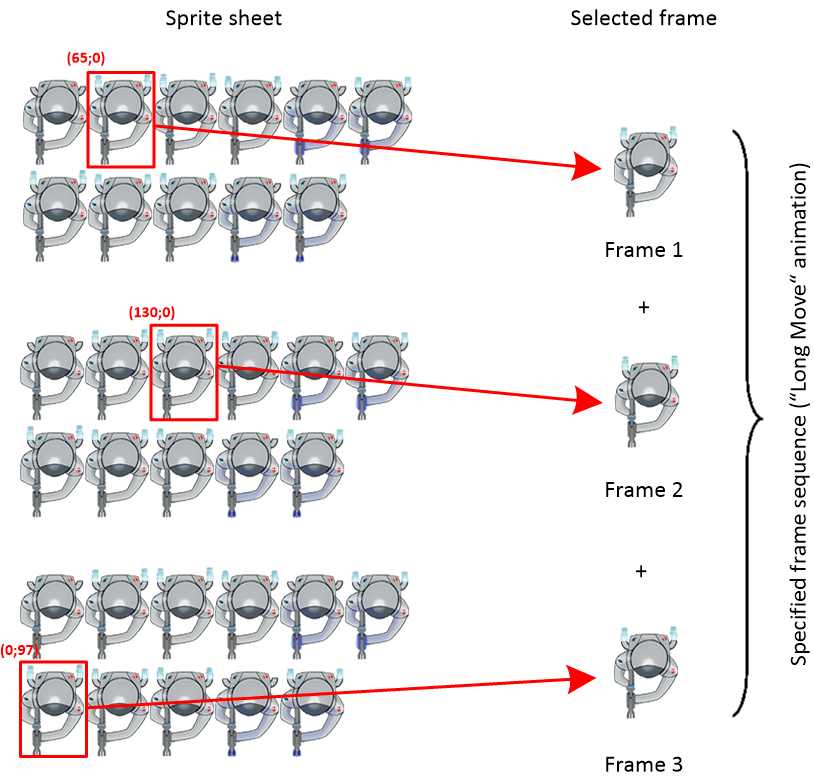
There is one line per frame, 11 lines in total, one for each of the 11 frames in the sprite sheet above. To the left of each frame’s coordinate listing is the “name” of the frame; the name tells us which specific animation (“Idle”, “Shoot”, etc.) the frame belongs to and in which order the frame has to be shown. Different animations can have different number of frames, depending on how much variation you want in that animation (“Idle” has only one whereas “Long Move” has 3). So let’s take “Long Move” animation as an example. All frames have the same size 64 x 96 pixels so the last two numbers in frame definitions are always the same. The first two give the (x;y) coordinates of the upper left corner and they will apparently differ from frame to frame. So to produce the “Long Move” animation we need to clip three 64 x 96 frames with upper left corner coordinates of (65;0), (130;0) and (0;97), respectively.
The three frames, when arranged in the order defined by the graphics artist, make up the “Long Move” animation. Notice that these frames do not follow one another in the sprite sheet. I don’t know why the graphics artist placed them like that in the sprite sheet. However, it doesn’t matter anyway, as long as the programmer gets the right coordinates in the animation data file and some way of identifying the first frame, the second frame, and so on. In this case, frame name tells what the number of the frame is; if you have an agreement in your team that the line number identifies the order in which the frame has to be shown, that will work as well (you will still need a way to tell where one animation ends and the next one begins). If you look at the animation data file above, you will see that in addition to the “Long Move” animation, there are 4 more animations. All of them are managed in exactly the same way. These 5 animations are what our player object is using. Every other animated object type, e.g. enemy, bullet, door, power-up etc. will obviously require a new sprite sheet and a new animation data file. The job of graphics artists ends here when they provide these files. From the programming point of view, part of the job is to create a system that can automatically create and manage frames from such files and be scalable, i.e. you should be able to add new animations easily. The second part is to actually make the animations show in the game. Let’s begin with the first part. Structure of Animation Data FilesWhen creating a system to manage animation data files, I looked at example animation code we got in Game Programming I course for guidance. Animation data file used in that implementation looked like this:
The first line specifies the path to the sprite sheet. The second line specifies animation name and how many frames the animation has. All following lines list the frame coordinates, one frame per line. The very first number in each line specifies for how long that frame has to be shown. Since I was going to use an external separately downloadable SFML class that manages sprite animations ( This example implementation in Game Programming I was built around the principle of having only one animation in the data file. But in our case, one object was going to use several animations (like our astronaut object – move, shoot, etc.). So for our implementation, I decided to extend the data file structure so that multiple animations, each with all of its frames, could be defined in a single data file. In a similar fashion, just as
And then I carefully list all the animations and their frames following the same method:
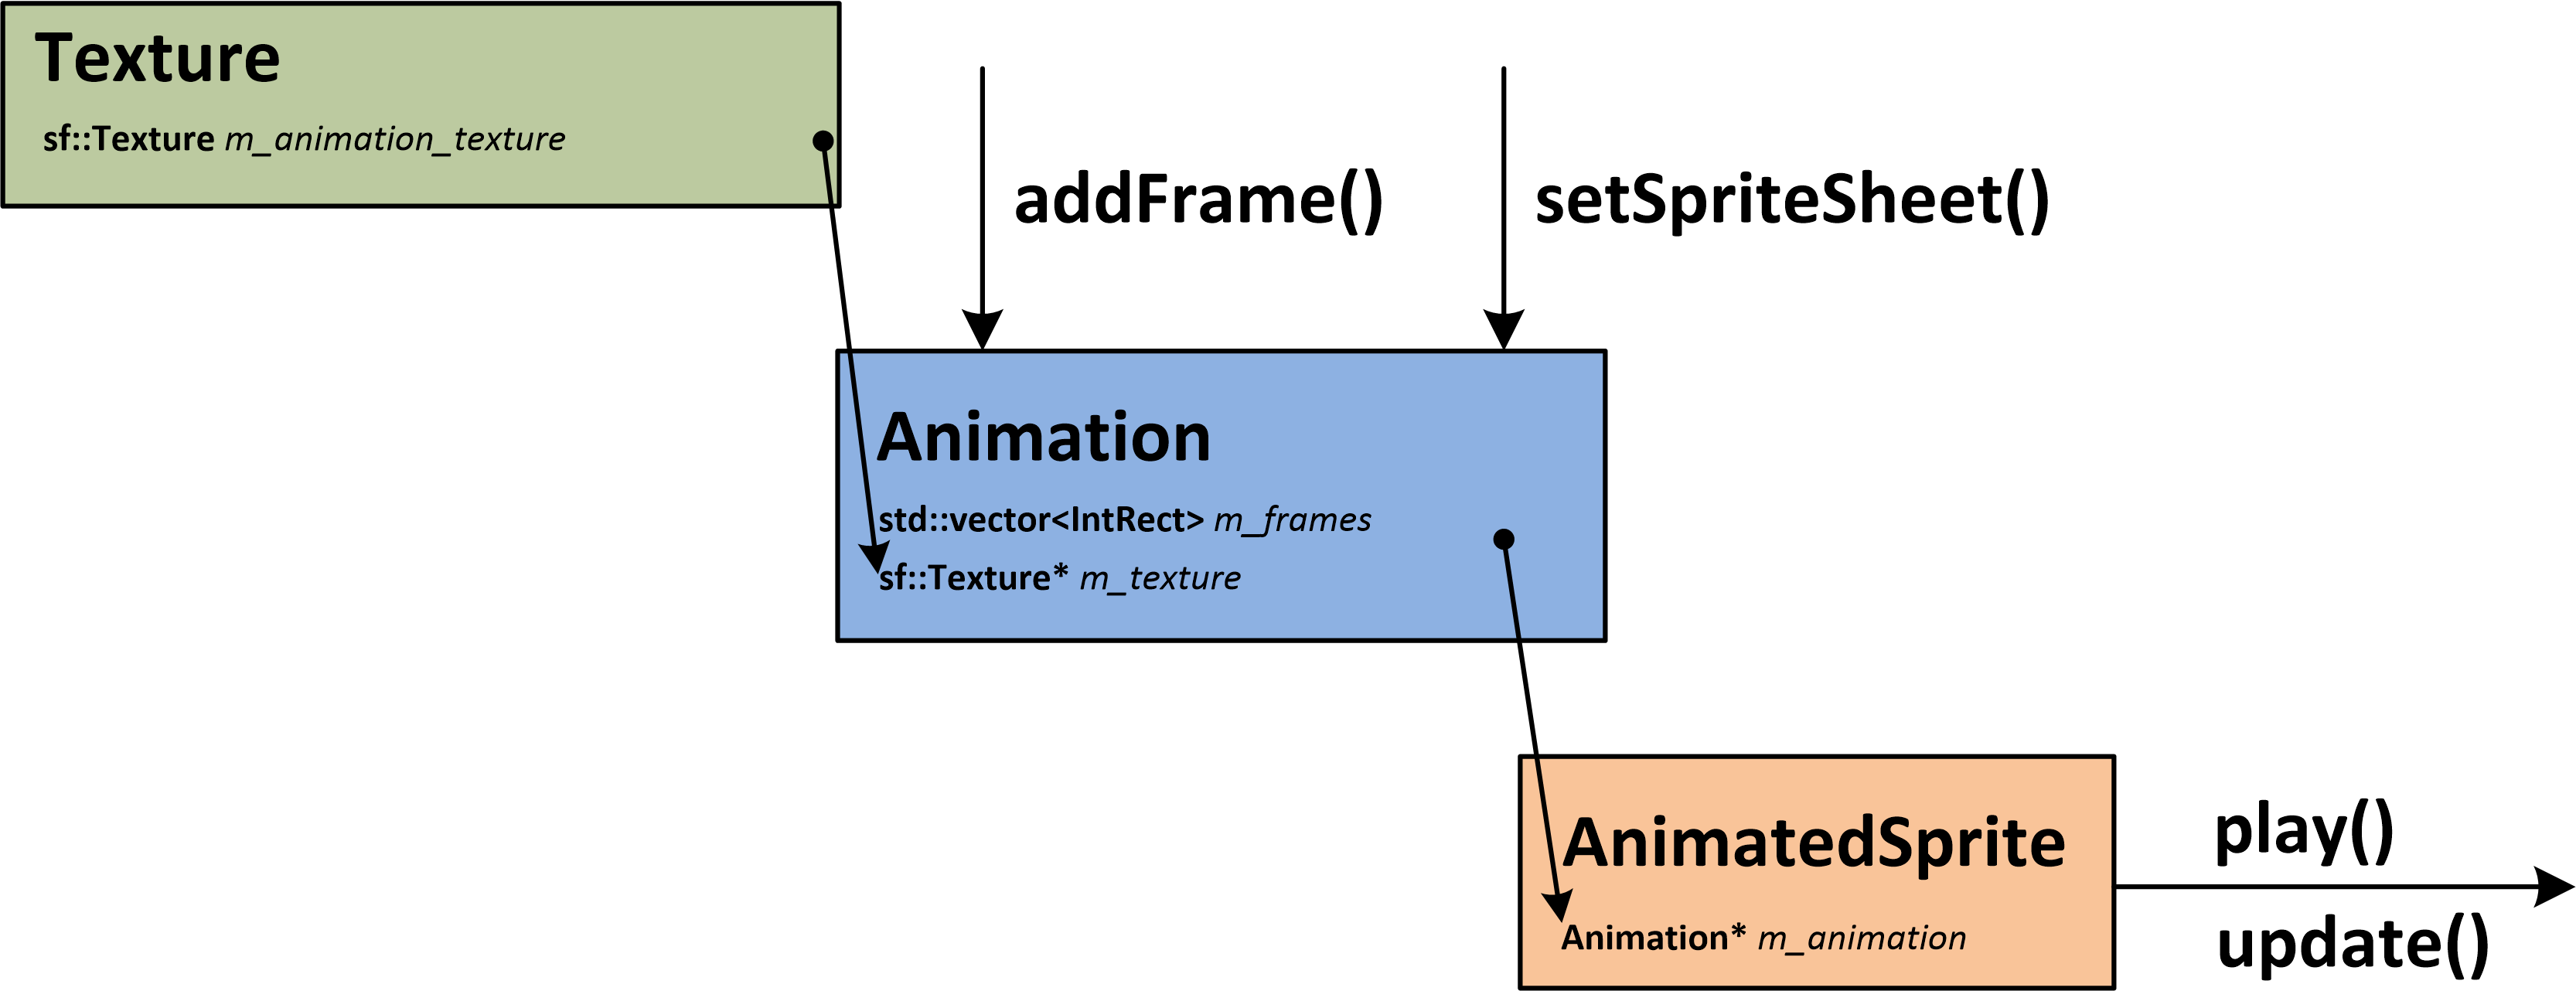
Wrapping up Animation.cpp and AnimatedSprite.cpp classesA concise description of how
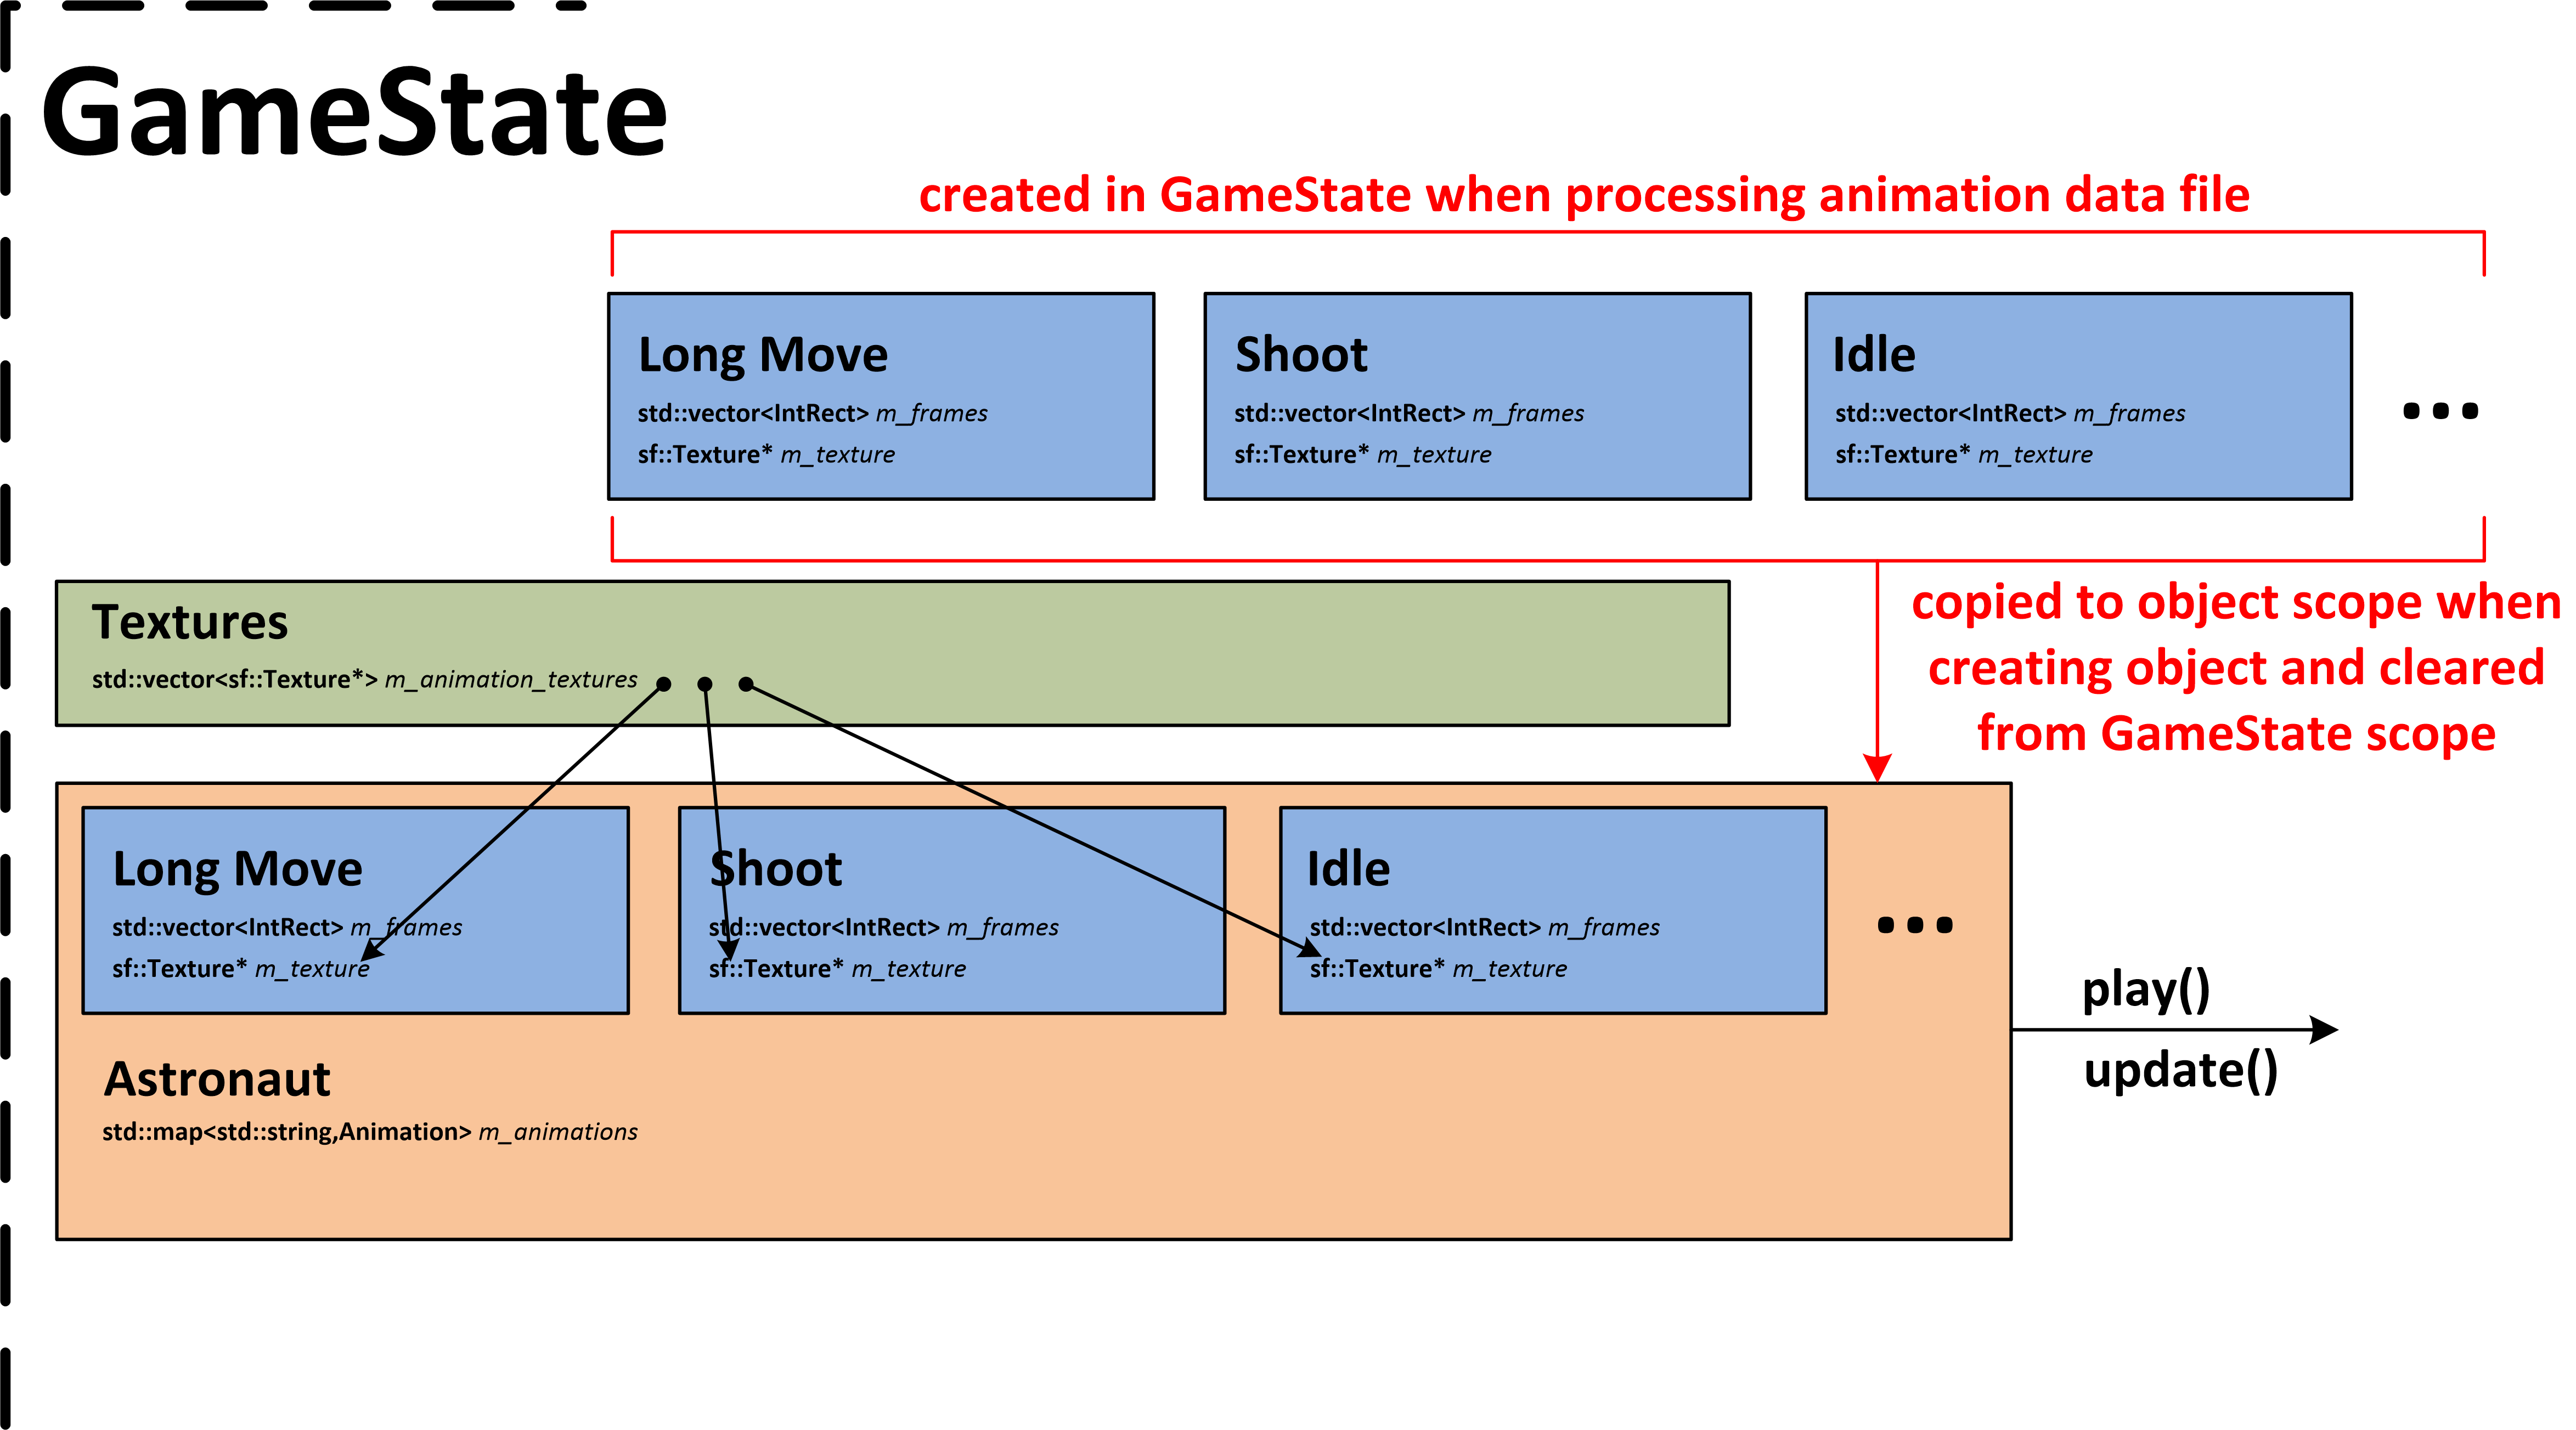
The diagram above shows the most important aspects of how the classes The class The frames are stored locally in the The class Animated sprites are updated once every game loop iteration, so this must happen in the The following scheme shows how the above system was extended to manage multiple animations for a single object:
So now I have described the idea of my implementation. It wasn’t that I first worked out all the details of this scheme and only then implemented it. I had spent hours and hours just sitting and thinking what would be the best way to make animations work. This system emerged gradually while writing, throwing away, re-thinking and rewriting the code many times. The next step is then to write this function, a method in the GameState, that will process animation data files and produce an Animation System: loading and creating the different animationsThis function is called The function takes one string parameter, the path to the animation data file, and returns an
std::map GameState::CreateAnimations(const std::string& filename)
{
	std::ifstream res;
	res.open(filename.c_str());
	if (!res.is_open())
		std::cout << "Failed to load " << filename <loadFromFile(object_path.c_str());
	m_animation_textures.push_back(texture);

	std::mapanimations;

	while (!res.eof())
	{
		int animation_count = 0;

		res >> animation_count;
		for (int j = 0; j > animation_name;
			res >> frame_count;

			for (int i = 0; i > rect.left;
				res >> rect.top;
				res >> rect.width;
				res >> rect.height;

				animation.addFrame(rect);
			}
			animations.insert(std::pair(animation_name, animation));
		}
	}
	res.close();

	return animations;
};
Here is a break-down of what the function does:
This loop is the original for-loop from the Arkanoid code. For every iteration of the loop (= for every object animation), the one animation is created:
Lines 44-45 are executed when all the frames for an animation in the animation data file have been processed. That animation is paired with its name (from lines 27 and 30) and inserted into At this point all the information to animate the object has been collected and stored in the Using the GameState::CreateAnimations() methodNow that we have the method that processes animation data files comes the fun part – to use this function. In our game, the function is used as follows:
std::map player_animations = CreateAnimations("../Assets/PlayerAnim.dat");
m_player = new Player(player_animations, m_x, m_y);
This all happens in the Inside animated object classes …Let me now describe how animated sprites, whose constructors receive copies of
Player::Player(std::map animations, float x, float y)
m_animations = animations; The object can at this point manipulate its animations as required.
//in the *.h file:
private:
    Animation* GetAnimationByName(const std::string& name);

//in the *.cpp file:
Animation* Player::GetAnimationByName(const std::string& name)
{
	auto itr = m_animations.find(name);
	return &itr->second;
}
NB: since the class has its own copy of animations map whose lifetime is guaranteed for the entire lifetime of the object, there is no need to return the value, i.e. copy the animations map again. That is why we only return a reference.
void Player::UpdateAnimation()
{
	m_sprite->play(*m_current_animation);

	sf::Time frameTime = m_frameClock.restart();
	m_sprite->update(frameTime);
};
NB: we are calling this method from the class update method which is in turn called every iteration of the game loop by the
	m_sprite = new AnimatedSprite;
	m_sprite->setFrameTime(sf::seconds(0.1));
	m_current_animation = GetAnimationByName("Idle");
	m_sprite->play(*m_current_animation);
As can be seen, we also set and start playing default animation, “Idle” for the player in this case. Selecting specific animation as m_current_animationThis is the final part of this post: How do you select which animation has to be played when? There are no recipes or answers to this question that can suit every animated sprite in your game. It depends on user input, e.g. if the player is firing, moving, if an object is damaged or under effects of a power-up. In general, it all depends on the game mechanics. This was the last part I was working on when I was implementing animations. When everything else had been done, I thought this would be the easy part. It turned out to be easy up to a certain point; beyond that point was perfection which I was trying to achieve, and it was really difficult to achieve. In the beginning of this post, I mentioned five different animations the astronaut has in our game. I will describe when each of these animations has to be played according to our game mechanics:
Some animations in the list are more difficult to get right than the others. E.g., it is very easy to toggle between “Idle” and “Move”: you just have to call your
void Player::SelectAnimation()
{
	if (!moving)
		m_current_animation = GetAnimationByName("Idle");
	else
		m_current_animation = GetAnimationByName("Move");
}
We have included 2 out of 5. “Long Move” is also easy to include because you only have to add an extra check that tests the player’s speed:
void Player::SelectAnimation()
{
	if (!moving)
		m_current_animation = GetAnimationByName("Idle");
	else
		if (m_speed < 95.0f)
			m_current_animation = GetAnimationByName("Move");
		else
			m_current_animation = GetAnimationByName("Long Move");
}
3 down, 2 to go. We have two Shoot animations left. Let’s include them both:
void Player::SelectAnimation()
{
	if (!moving)
		m_current_animation = GetAnimationByName("Idle");
	else
		if (m_speed < 95.0f)
			m_current_animation = GetAnimationByName("Move");
		else
			m_current_animation = GetAnimationByName("Long Move");

	if (shooting)
		if (!moving)
			m_current_animation = GetAnimationByName("Shoot Idle");
		else
			m_current_animation = GetAnimationByName("Shoot Move");
}
Notice that additional moving check has to be added after the shooting check to know which of the two shooting animations to play. We cannot check for shooting separately from moving, since their animations partially cover both. This is a redundancy in the code: we have already checked moving once and are now forced to check moving again. However, this redundancy cannot be easily got rid of. And yet this code doesn’t work as expected … When I ran this code, the shoot animation (be it “Shoot Move” or “Shoot Idle”) never seemed to play, however many times I would shoot. The reason is this: The animation is set to e.g. “Shoot Move” in this frame and starts playing. The computer begins processing the next frame immediately and determines that the player is no longer shooting in that next frame. Indeed, if you pressed the fire key and released it, the computer will only register you shooting at that particular frame – that is the desired behaviour. The “Shoot Move” animation is still playing but in the Indeed, upon carefully inspecting the player sprite, I could see the shoot animation flash for a tiny fraction of a second and then disappear all too soon. The shoot animation, whether “Shoot Idle” or “Shoot Move”, must be allowed to finish playing. This can be achieved by disabling the “move” block (lines 3-9) for as long as the shoot animation is playing. When the shoot animation is over, we should start checking for move again. That’s the simple idea. But how do you know when the shoot animation is over?
if (shooting)
{
	if (!moving)
		m_current_animation = GetAnimationByName("Shoot Idle");
	else
		m_current_animation = GetAnimationByName("Shoot Move");
	m_sprite->setLooped(false);
}
the “Shoot” animation will stop after it has played out once. We can then use another method, By adding an if-statement before the “move” block to check if a shoot animation is playing, we can skip the “move” block while a “shoot” animation is playing and run the “move” block otherwise. This if-statement must therefore check two things: 1. if the current animation is playing, and 2. if the current animation is a “shoot” animation. This check can be realized with this if-statement:
if (!(m_sprite->isPlaying() && (m_current_animation == GetAnimationByName("Shoot Idle") || m_current_animation == GetAnimationByName("Shoot Move"))))
Notice the One final addition is required to make the player aniations work correctly. When the “shoot” block has been run the current animation is set not to loop. If we run the “move” block afterwards and set the cureent animation to a “move” animation, it will still be non-looping, so it will play once and stop. So whenever the “move” block is run and sets the current animation to a “move” animation, it also has to reset the looping behaviour to So the final version of the method which selects the right animation for the player looks like this:
void Player::SelectAnimation()
{
	if (!(m_sprite->isPlaying() && (m_current_animation == GetAnimationByName("ShootIdle") || m_current_animation == GetAnimationByName("ShootMove"))))
	{
		if (!moving)
			m_current_animation = GetAnimationByName("Idle");
		else
			if (m_speed setLooped(true);
	}

	if (shooting)
	{
		if (!moving)
			m_current_animation = GetAnimationByName("ShootIdle");
		else
			m_current_animation = GetAnimationByName("ShootMove");
		m_sprite->setLooped(false);
	}

	m_sprite->play(*m_current_animation);

	sf::Time frameTime = m_frameClock.restart();
	m_sprite->update(frameTime);
}
Can this repeating and possibly redudant code in I thought about it and tested it, and unfortunately it didn’t work without that second half. The thing is that if you don’t additionally check if the current animation is a “shoot” animation, you will only be able to run the “move” block once. Suppose the current animation is a “shoot” animation, it has played out and is now stopped. In the next frame, the “move” block executes, sets the current animation to a “move” animation and sets looping to Final thoughtsFrom the code examples above and the explanations that follow you probably got the impression of how difficult animations are in video games. The code in Animations tend to get pretty complex pretty fast. The more aspects you add to a sprite, the more quickly your code that manages those animations grows. Suppose we wanted to include a “damage” animation, when player sprite flashes in red when hit by an enemy bullet. The idea is quite simple – check if the player is receiving damage and play the “damage” animation. If not, play the usual animation of whatever the player is doing (moving or shooting). But that actually means that for every of the 5 animations we have right now, there needs to be a separate “damaged” version. If you have only one, “common” damage animation where the player sprite has red tint and is otherwise “idle”, and you get damaged when moving, the thrusters effect will disappear (while you’re still moving) and reappear after “damage” animation is over. Moving, shooting and getting damaged all overlap and must be explicitly taken care of in the code. This is one of the most difficult tasks I have worked on in the project. But now I understand how 2D animations work and how you can implement them. |